Quick Links:
- Overview
- Camera Settings
- Trigger Settings
- Work Day
- System Settings
- Wireless Settings
- Scheduled Events
For a complete reference list (with explanations) of camera settings in both the camera and app, please see Camera Settings Reference.
(This information is from camera test team member Elizabeth Swoope)
I'm often asked about my settings, so I thought that I’d post an example. These are the settings that I use for all my cameras except for cameras that are on feeders. Feeder cameras are set with trigger intervals of from 2 to 5 minutes.
I run all my GoLives on either solar alone or 12 V battery + solar. I do not use AA batteries in my GoLives.
Overview
Main Camera Settings page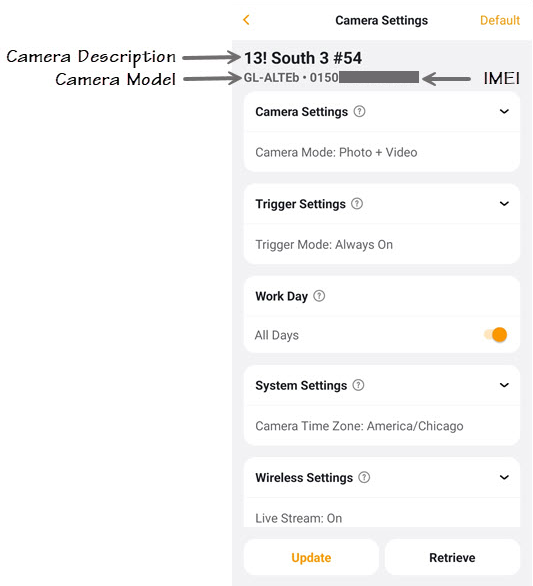
- Camera Description: displays on the app home page. By default, it’s the camera model.
- I use two-digit numbers to start my descriptions to help me organize the cameras in the order I want to see them. This is set on the Camera Options page.
- Camera Model and IMEI
To access the individual settings within a category, tap the down arrowhead to the right of the category.
Accessing the settings
- Tap > to access the options for any individual setting.
- Choose your desired setting from the list.
- Tap Done. You must complete this last step in order to complete your changed setting.
Camera Settings
- Nametag: Up to 8 characters that will print on the photo info strip. The default is the camera model.
- Camera Mode: all of my cams run Photo + Video. The photo is taken from the first few seconds of video so there is no time gap between the photo and the start of the video as there is with GoCam and Ghost.
- Photo size: the camera’s native resolution is 4 MP so that’s what I use. (The other option is 8 MP. The additional 4 MP are calculated by averaging values from the original 4 MP.)
- Thumbnail size: the Large ones (1376 x 768) are usually good enough that I don’t need to request the HD photo. Normal thumbnails (800 x 480) save data and transmit a little quicker but they are grainy and don’t zoom well.
- Video Length: I use 20 seconds more often than the other settings but I do have some cameras set to 30 seconds. You can choose from 5 seconds to 30 seconds in 5-second increments.
- Video Format: I usually use 1920 x 1080 (1080p). However, that resolution uses more data than the other two settings. If you want to save data, try either 1280 x 720 (720p) or 800 x 480. 800 x 480 is the resolution for live-streamed video
- Video Record Sound: I keep this setting ON.
- for length and 320 x 240 for video format. I record sound.
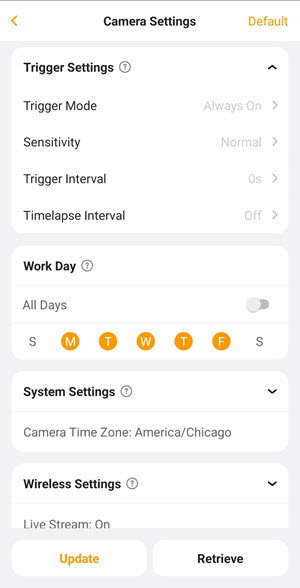
Trigger Settings
- Trigger Mode: either Always On if you want the camera to run 24 hours a day with the same settings Start - Stop if you want it to run only part(s) of the day or you want to use different settings during different parts of the day. How to use Start-Stop times
- Sensitivity: normal (my experience is that there's seldom a reason to use any other setting)
- Trigger Interval: 0 seconds because that gives me pictures as fast as the camera can take and send them. This is not how fast the camera takes pictures (i.e., setting 30 seconds doesn’t mean the camera takes pictures every 30 seconds). It is the “rest” time between when the camera finishes sending a picture and when it can take another if there is still motion in front of the camera. If the camera is on a feeder or somewhere with a lot of activity, I increase this to three to five minutes.
- Timelapse Interval: I don't use timelapse unless I am testing a camera and need a lot of pictures in a short time. You can use this to monitor a food plot where deer may be grazing far enough away from the camera that they don't trigger the camera or to record the progress of a construction project. The available settings are 30 seconds to a minute in 5 second increments, 1 minute to 60 minutes in 1 minute increments, and 1 to 8 hours in 1 hour increments. For settings less than a minute, the camera may not be able to take and transmit a photo in that short a time so you will want to experiment with the time that works best. If sensitivity is not off, the camera will also take motion-triggered photos.
Work Day
If you want the camera to take pictures only on certain days, toggle All Days off, then tap the days you want the camera to work.
System Settings
- Camera Region
-
Camera Time Zone: make absolutely, positively sure that you set this. The actual US time zones aren't listed, so choose a big city in your time zone. It doesn't have to be the ones listed here, just pick one:
Eastern: New York City
Central: Chicago
Mountain: Denver
Pacific: Los Angeles - Time Stamp: On if you want the info strip on your photos, Off if you don't.
- Flash Power: High for most situations but if your target area is small or the backdrop is very close, you may want to try Low.
- Overwrite: You will probably want Overwrite on (checked), as well. This means that when the SD card is full, the camera will write the newest photos and video over the oldest ones. Even with overwrite on, you may need to format the SD card when it's full.
- Battery Type: specify what power source(s) the camera is using. If you are using any 12 V battery, regardless of type, choose the appropriate 12 V option from the list. If you are using a 12 V battery that is being charged by a solar panel, choose 12 V. The only time to use solar is when the camera is directly connected to a solar panel.
You will probably want both of the following settings on.
- Camera Locator enables the camera to retrieve its geolocation when the camera is on and camera movement is detected or the camera is sending the scheduled event 1 status report.
- Camera Tracker enables the locator to work even when the camera is turned off.
Wireless Settings
- Live Stream should probably be on even if you don't plan to live stream much or at all. With Live Stream on, the camera will usually respond to requests (for HD photos, videos, SD card format, setting updates, firmware updates) immediately. It does use more power because the camera is connected to the network all the time. If you turn this off, the camera will respond to requests only when the camera sends a photo or performs a scheduled event.
- Send Photos should be on unless you want the camera to take photos but not send them (e.g., if you're trying to conserve power).
- Daily Limit 0. If you want to limit the number of photos, use a longer trigger interval. Otherwise, you’re going to get the first 20 or 50 or 100 photos after midnight rather than pics all during the day.
Scheduled Events
I cannot stress the importance of setting scheduled events, especially with these model cameras. Scheduled events make the camera check in at the specified times even if nothing is happening to trigger the cameras. You'll reduce your wait time for requests (HD photos, videos, SD card formats, setting changes, etc.). You'll also get an early "heads up" if the camera goes down because it will miss more than one scheduled event. You don't have to wonder whether the camera is down or whether there just isn't anything happening.
There is one default scheduled event, a status report at midnight. That means that the camera will check in at least once a day as long as it's up and running.
Scheduled event types are:
- Status Report
- Photo
- Batch Sending (the camera will not send photos when taken but will send them as a batch at the specified time)
My Scheduled Event settings:
Midnight: status report
3 AM: status report
7 AM: status report or photo (test cameras). I get up around 6, this gives me a chance to request videos or HD photos for any “interesting” photos during the night
9 AM: photo
Noon: status report or photo (test cameras)
3 PM: photo
6 PM: status report or photo (test cameras)
9 PM: photo (so I have one night photo)
There are a couple of unused events with this schedule. You may want more or fewer events at different times.